Tuesday, March 26, 2013

Au Naturale


We are going to my grandparent's house this Easter for brunch and an egg hunt I'm putting together for the kids.  I'm shooting down a little early so I can jazz up the table before everyone gets there because It's what I love to do.  They live on a beautiful piece of property complete with woods and a pond, so I thought I'd make the Spring table themed around nature.  

Below is the start to my centerpiece which included a vase my lovely Executive Producer (Craig) bought me for Valentine's Day, twigs from a downed branch, a nest we found last year some mischievous critter knocked down and two small nests I grabbed some time back because I'm a compulsive buyer.  Don't mind the Nosy Nancy in the left picture, she's always in my business.  


I added some moss and feathers along with some eggs from the local craft store, and I'm loving the way it turned out.  I may see if I can snag some fresh blooms before we head down to poke in there as well, as long as I can run faster than the owner of whosever yard I will be snipping them from.


To go along with the nature inspired tablescape I  visited two craft stores in search of mushrooms and came up empty handed, so I had to figure out a way to make my own.  I ravaged through my craft supplies for something I could whittle them out of.  I had nothing that would work, but did find some styrofoam pieces inside a Pez set Ronan received as a gift.  I thought I'd give it a shot and was pleasantly surprised by the result.

Using a sharp blade I cut smaller pieces from the blocks of styrofoam, rounded the edges, slashed the underside to look like mushroom gills and attached a small piece using glue for a stem.


After painting the fungi, I placed them atop some moss inside a butter dish I scored at an antique store and added a sweet little ladybug and stone.


I'm still editing and creating my vision for the table, but will post pictures of the final product right after Easter.

Wednesday, March 20, 2013

Spring has Sprung


For an Easter egg hunt this year I wanted to come up with a cute idea for the baskets or bags the kids would be collecting the eggs in.  I stopped by the dollar/party store near our house in search of ideas.  I found simple paper gift bags that turned out to be a perfect blank canvas.  I also snagged some patterned paper and stickers on the cheap.  

First I traced letters from stencils I already own onto the bags and painted in the lettering.  Painting the letters was quite tedious and took a steady hand, but It's kind of relaxing to me so I didn't mind.  I then did a different theme on each using the patterned paper and stickers.  I love the bright colors and think they're neutral for either a boy or girl.  


Monday, March 11, 2013

Another Gem For The Closet


I've had this dress I picked up at a consignment shop for over three years.  I loved the tulle underneath and of course the classic black with white polka dots.  It fit pretty snug on top when I decided I couldn't live without it, but figured I'd make it work.  Well, I've never made it work.  I've grown since and needless to say, the "snug" turned into "not gonna happen".  The lower skirt section of the dress fits perfectly around my waist, so I began ripping apart yet another article of clothing to fit my needs.


I removed the stitching to separate the top from bottom and hemmed the edge of the waist.  


Add a white tank, belt and cardigan and I've got myself a super cute new outfit!  I actually wore it this past weekend on a venue walk through for a wedding I'm assisting with.    


Now, I don't like to waist, so I was trying to figure out what I could construct from what I had left over.  Craig had the great idea of making an apron since I don't have a single one, genius!  This project will have to wait until I have a sewing machine because I'm no master seamstress, but I have the idea of using the top from this polka dot gem, the remaining skirt from my Reconstructing The Wardrobe post,  and some pink fabric I cut from a babydoll lingerie piece that sprouted a hole.


This is the rough plan of what the apron will look like.  I'll have to get some ribbon or other fabric that will work for the neck halter and back ties, as well as figure out where to cut and how to configure this thing, but I can't wait until I can get started on it.    


Thursday, March 7, 2013

Reconstructing The Wardrobe


We go to the library every weekend for new books.  Last week as I was browsing through the cooking section I stumbled upon sewing books.  I grabbed a few about reconstructing your t-shirts and turning items you already have into handbags.  Once I thumbed through them my little wheels started turning, and next thing I knew I was digging through my closet and dresser for items I could cut, sew and Frankenstein together.  

My first project was cutting between studs on an angel wing shirt so I could wear another underneath for a little bit of color.  I used a razor knife thinking it would work better than scissors since it's so sharp, but realized the scissors would have been the way to go.  The razor ended up pulling at the fabric as I was trying to cut, next time, scissors it is.  

The black is what the white shirt looked like before I got my crazy mitts on it.  I think it turned out okay, and I like that I can wear different colors with it.

  
The next took me two whole days to complete.  I don't have a sewing machine so this was very time consuming to stitch by hand.  I acquired the grey dress from a consignment shop and loved it at the time, but is much too short for me to wear comfortably and flairs out like a teacup so my hips look even bigger than they are.  The denim skirt was a thrift shop find and I loved that it had pockets, but again when I went to wear it I decided it didn't flatter my curves too well.  


I sketched out a line in chalk to cut from the denim skirt, painstakingly sewed the bottom of the skirt to the dress by bunching even sections over and over, and sewed the buttons and straps from the skirt to the dress (a tube top is not made for what I've got on top).  The dress is very stretchy and thin so I couldn't just sew the buttons on and use the straps.  I used brown thread and followed the existing stitching around the straps to anchor the whole thing down, so the buttons are just for looks now.   


I am in love with this dress and can't wait for it to warm up so I can wear it.  The denim at the bottom twirls when I move, weighs the existing dress down so it doesn't flair at my hips and is a comfortable length for me.


I have another outfit I will actually wear instead of two I haven't touched hanging in my closet.  I'm so crazy about reconstructing other items I have and don't wear and will be on the lookout for a reasonably priced sewing machine in the future.


And of course after I was done taking pictures...


I can't lay anything down without it becoming a cat bed.

Monday, March 4, 2013

Being Your Own Personal Stylist

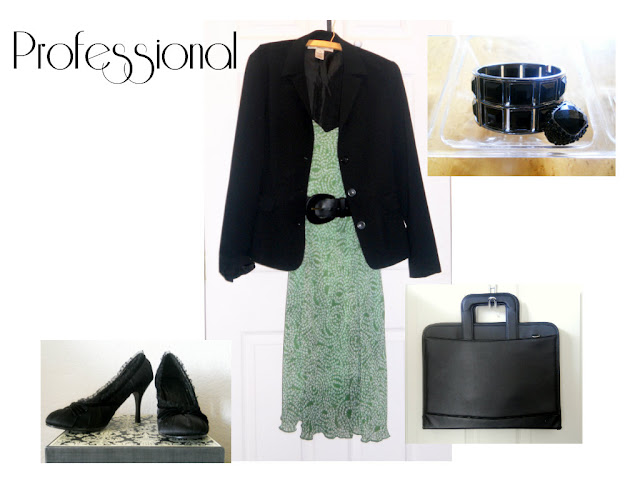
I'd like to keep my closet organized by shirts, pants, dresses and colors.  I hate laundry though, so I usually end up cramming things wherever they will fit in the front of the closet just to get it over with.  The result is not knowing what I have or what will work together.  I decided to go through my closet a little at a time, put  together outfits and take pictures so I can see what I have without trying on a million different options.  

It's amazing how many different looks you can create by mixing and matching pieces and accessories.  If you have a hard time figuring out which colors will work together, check out a color wheel.  It gives you a quick visual and you may find combinations you never thought would work.  

I used ipiccy.com layers to add my outfits and different accessories together in one picture.  I love that I will be able to flip through my different options and choose what I want to wear without slipping a single piece on.


By swapping out different items I can make one dress go from casual to professional...

and from professional to party ready.

Here's another example of taking a red dress and this awesome net shirt I found at an antique store for a casual summer look.

With a sweater and Mary Jane style shoes, the same red dress takes on a more work friendly look.

The following website have some great tips for putting together outfits, trends and adding to what you already have:
polyvore.com
thechicfashionista.com
womens-fashion.lovetoknow.com


Pin It button on image hover